This is my go to vegetable side dish. It is so easy to make this baked asparagus and it only takes about 15 minutes total. My favorite thing about this recipe is the fact that my 2 year old will eat this without it turning into a negotiation! We eat leftovers a lot at my house and I love that I can quickly make up some fresh asparagus to go with the leftovers. You can use any type of Italian cheese on this asparagus. I usually use mozzarella or grated Parmesan. Preheat oven to 350°F. Rinse asparagus and break off the ends. Place the asparagus in a row on a baking sheet. Drizzle the asparagus with olive oil. Use your hand or a spatula to fully coat the asparagus in the olive oil. Sprinkle the salt and pepper over the asparagus. 
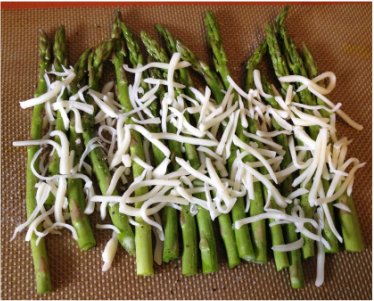
Cover the asparagus with the cheese, starting below the tops of the asparagus. Bake for 10 minutes.
0 Comments
My mom started making these tacos after she tried some tasty pork tacos at a small taco restaurant. She created this recipe that is very similar and extremely delicious! I love these tacos because the meat is cooked in the crock pot which is always easy. Because the meat is cooked for so long it doesn't take a lot of ingredients to create a flavorful taco. We usually top these tacos with a decent amount of cilantro which gives these tacos a wonderful freshness. I apologize for most of the pictures, i had very poor lighting. IngredientsDirectionsPlace the pork shoulder into the slow cooker, and season generously with the black pepper and salt. Cover, and cook on Low 5 to 8 hours until the meat is very tender. While the Pork is cooking slice the onions and the poblano peppers. Once done, drain the pork, reserving some of the cooking liquid, and shred the pork. Add the Poblano peppers and the onions to the shredded pork. Cover, and cook on High 2-3 hours. Add additional salt as needed. Warm the tortillas in a skillet, top with pork mixture and fresh cilantro. Enjoy!My family has had the privilege of being Sea World annual pass holders for the past year. We have thoroughly enjoyed everything that the park has to offer. The animals, rides, and shows are all very well done! I highly recommend going to Sea World if you are ever in Orlando. I also feel like Sea World is the BEST option for young children. It is not as crowded as Disney and they can participate in almost everything. Not to mention there is a lot less waiting in lines because of the many shows and animals to view. I also love the educational aspect of going to Sea World. My Little One has really learned a lot about the different marine animals and is always excited to visit them! I have put together a list of some of the things that we learned this year that made our days more enjoyable! 1. Go directly to the penguins. Do not pass Go. Do not collect $200. The penguin ride in the Antarctica section of Sea World is the most popular ride in the entire park. If you do not go to it when the park first opens you will be waiting between 30 minutes to over an hour to see the penguins. The only way to see the penguin exhibit (which is REALLY AWESOME!) is to ride "Antarctica Empire of the Penguin". If you get to the park early and head straight to the penguin ride you should be able to walk onto the ride with practically no wait time. 2. Don't let a sleeping child keep you from seeing the shows! There is specific seating for parents with sleeping children in strollers at the very top of the stadium seating for the Sea Lion and Dolphin shows. There is also seating in the Shamu show but it is pretty close to the splash zone! You are not allowed to bring strollers into the stadium unless your child is sleeping. I have even been asked to lift up my daughter's blanket to prove that she is asleep. The sleeping child seats are not the best seats in the house but it is nice to be able to sit down and enjoy a show without having to wake up your toddler! 3. Use the baby center! It is located in Happy Harbor (the section dedicated to young children) and is very helpful. There is a room for breast feeding, which is quiet and clean. There is also a room with real changing tables, this is much nicer then having to fight a sea of people to use the changing tables in the bathrooms. There are also some baby toys and a T.V. so this is a good spot to take a break if your kids are getting overheated. Located inside is a bathroom for adults or older kids to use while you take care of your baby. I like to come in here to change my Little One into her swimsuit before going to the splash pad. The best feature is the microwave! Why buy a $7 popcorn when you can pop your own? I have seen people heat up easy macaroni and cheese and hot pockets for a quick, cheap lunch! The baby center is never crowded and is super convenient. 4. If you are going to eat at the Antarctica quick serve restaurant then you need to know about the indoor seating. This is our favorite location to eat if we are going to be purchasing a meal at the park. The problem is when you exit the cashier you are presented with a large amount of outdoor seating, some of which are covered. However there is a building in the far left corner of the seating area that is even better. It is indoors and air conditioned...very important on a hot day in Orlando. For some reason there are not any signs indicating that there is seating inside and they usually don't' have any doors propped open. Most people do not realize that this building is for guests to sit and enjoy their meal. Most of the time we eat here there are only one or two other families in here. It is very big and spacious (great for bringing in a stroller), there are high chairs, a condiment station and did I mention the air conditioning! 5. To save time skip the line and the outdated Arctic video by going through the gift shop to enter the beluga and walrus viewing. I have never had anyone say anything to me when I have done this. Besides the sign says "No Re-Entry" not "No First Time Entry"! The best part of entering this way is you can keep your stroller with you, meaning you can see the animals (indoor!) even if your child is sleeping. I normally would not disobey signs but for this part of the park there is normally plenty of room at the animal viewing and I don't feel like the stroller is getting in anyone's way. Several times (in the off season) we are the only ones down in the viewing to begin with!
This is comfort food! I first had this meal at my parents church for Wednesday night supper and I told my mom that she needed to get this recipe. Once we realized how easy this casserole is to make; it didn't take long for us to start making this regularly. I absolutely love this recipe! It is perfect for a weeknight dinner and holds up well the next day for leftovers. Even my two year old gobbles this Poppy-Seed Chicken up! IngredientsDirectionsPreheat an oven to 350 degrees F. Dice the chicken breast and season with salt and pepper. Add oil to a pan and place on medium high heat. Add the diced chicken to the hot pan and cook the chicken until no longer pink. While the chicken is cooking mix together the Sour Cream and the Cream of Chicken Soup in a medium bowl. Add the cooked chicken and a generous amount of poppy seeds to the sour cream mixture. Spread the poppy-seed chicken mixture into a baking dish. Crush the Ritz Crackers while they are still in the sleeve by gently squeezing them with your hand. Top with the Poppy-Seed Mixture with the crushed Ritz Crackers. Pour the melted butter over the crackers. Sprinkle extra poppy seeds on top if desired. Cook in oven for 30-45 minutes or until the topping is golden. Serve the Poppy-Seed Chicken over rice. Enjoy!My hubby loves cookies. He prefers cookies to cake, but I love cake...mostly for the icing. So i have found the perfect cookie cake recipe. The best of both worlds! I have made this several times and it is always a big hit! The chocolate chips could be substituted for flavored chips or chocolate candies; the possibilities are endless :) Ingredients
DirectionsPreheat the oven to 375 degrees F. Line a 9 x 13 pan with parchment paper and grease the parchment paper. In a large bowl, cream the butter and sugars. Add the eggs, beating well after the addition of each. In a bowl, combine the flour, baking soda, and salt and mix with a whisk. Add to the butter mixture, mixing well. Add the vanilla extract and mix well. Fold in the semi-sweet and white chocolate chips. Spread the cookie batter across the bottom of the prepared pan. Bake until the edges are golden and the cookie is set but the center is still slightly soft, about 25 minutes. Cool in the pan for 10 minutes, then transfer to a wire rack to cool completely. You can easily remove the cookie cake by lifting the parchment paper and quickly moving the cake. If you want you can decorate the cookie cake with icing! I like to use this Butter-Cream Icing. Below are some pictures of the Birthday cake my daughter and I made for my hubby's birthday! Happy Decorating!I have tried out a lot of different recipes for butter-cream icing. Most of them have the exact same ingredients in different ratios. This is my personal favorite version! It is creamy and sweet. It also is easily piped or spread onto cakes and cookies. IngrediantsDirectionsIn a large bowl, cream together the butter and vanilla. Blend in the sugar, one cup at a time, beating well after each addition. Beat in the milk, and continue mixing until light and fluffy. You can use the icing as is or you could mix in food coloring. Here is a cookie cake that my daughter decorated with this butter-cream for my hubby's birthday! HAVE FUN!I love roasted veggies! Carrots are exceptionally delicious when they are roasted. They get soft and start to char on the outside. This is my favorite way to eat carrots (except for when they are in a pot roast!). You can season them with anything you like. It might be fun to play with some spicy flavors to create sweet and spicy carrots? For now I season mine with dill or sometimes parsley. I usually use whole carrots but I have also been successful with baby carrots. I usually make just enough for us to have for dinner. Then I will make new carrots to go with the leftovers. I find that we eat our veggies better when they are made fresh! Because the quantity changes I don't have set amounts, just ingredients! IngredientsDirectionsPreheat the oven to 400 degrees F. If the carrots are thick, cut them in half lengthwise; if not, leave whole. Slice the carrots diagonally in 1 1/2-inch-thick slices. Toss them in a bowl with the olive oil, salt, and pepper. Transfer to a sheet pan in a single layer. Roast in the oven for 20 minutes, until browned and tender. Sprinkle the carrots with minced dill and serve. Enjoy!My hubby and I absolutely love deep dish pizza! When we lived in Atlanta we had a Chicago style pizza place walking distance from our apartment (which we took full advantage of). Unfortunately it is super expensive to buy deep dish from a pizzeria so I decided to find a recipe to make our favorite pizza at home. This is the perfect recipe for a delicious crust, savory sauce and toppings of your choice! Ingredients
Toppings *You can use whatever toppings you like! This is what I like to use, but it is just a suggestion! Making the Pizza DoughIn a large bowl, combine the water, yeast, and sugar and stir to combine. Let sit until the mixture is foamy, about 5 minutes. Add 1 1/2 cups of the flour, the corn meal, 1/2 cup of the oil, and the salt. Mix by hand until it is all incorporated and the mixture is smooth. Continue adding the flour, 1/4 cup at a time, working the dough after each addition, until all the flour is incorporated but the dough is still slightly sticky. Turn the dough out onto a lightly floured surface. Knead until smooth but still slightly tacky, 3 to 5 minutes. Oil a large mixing bowl with the remaining 2 teaspoons oil. Place the dough in the bowl and turn to oil all sides. Cover the bowl with plastic wrap and set in a warm, draft-free place until nearly doubled in size, 1 to 1 1/2 hours. *While the dough is rising; make the Pizza Sauce. Making the Pizza SauceIn a medium saucepan, heat the oil over medium-high heat. Add the garlic and cook, stirring, for 30 seconds. Add the herbs, seeds, salt, and black and red peppers, and cook, stirring, for 30 seconds. Add the tomatoes, wine and sugar, and bring to a boil. Lower the heat and simmer, stirring occasionally, until thickened, 20 to 30 minutes. Remove from the heat and puree with an immersion blender. Let cool completely before using. Making the PizzaOil a large casserole dish with olive oil. Use a baking dish that has tall sides. You could also use two round deep dish pizza pans. (One of my handles is broken, but it still makes a great pizza!) Press the pizza dough into the pan, pressing to the edge and stretching about 1 1/2 inches up the sides. Let rest for 5 minutes. Layer the mozzarella cheese all over the bottom of the pizza. Top each with the pepperoni, bell peppers, onions, and sausage. (We left pepperoni off of part of the pizza because our friend who was staying for dinner doesn't like pepperoni.) Ladle the sauce evenly over the pizza.. Top with Parmesan cheese and more basil. Bake until the cheese is bubbly and the crust is golden brown, about 30 minutes. Remove from the oven, slice and serve hot. ENJOY!This year for Mother's Day my wonderful hubby created this Quality Time Jar! This was such a sweet surprise and I can't wait to use this tool to help us make the most out of the time that we spend together. I love this idea because it encourages us to make our sometimes limited time together special. As an added bonus he took pictures of the process that he used to create this "QT" jar so that I can post it to my blog. The jar is set up so that we draw a Popsicle stick and do whatever "mini-date" is written on it. There are four different colored Popsicle sticks. Each color represents a different amount of time that the activity should take. For example if we only have 30 minutes of free time we would choose a blue Popsicle stick! There is also a special color for family activities. This can be used when we have free time and our daughter is around to participate in the activity. I love that this will teach her about the importance of spending Quality Time with your family! Materials
DirectionsPaint the Wooden Tag with the paint of your choosing. Allow the tag to dry completely. Cut out the Quality Time Printables. Glue the "QT" circle onto the top of the mason jar. Choose your desired "Quality Time Jar" Label and fill in the empty spaces with the colors of your Popsicle sticks. Then glue the label onto the painted wooden tag. Measure and cut the twine so that your tag will hang around the mason jar. Tie the twine onto the wooden tag. Tie the tag securely onto the mason jar. Write down the different activities onto the Popsicle sticks. Be sure to have the time that the activity will take match up with the correctly colored Popsicle stick. Below is the activities that my husband used for my Quality Time Jar! We can add to the activities whenever we think of something new to do together! Place your Popsicle sticks into the jar and start making the most of your time together! This is a recipe that I first started to make when I was in high school. I remember making it back then because it was the first time I ever used wine in a recipe and I thought I was "so cool"! This is a simple and delicious dish that is perfect for a week night. Serve over rice and pair with your favorite vegetable. You can change the amount of lemon depending on your personal preference. Sometimes I add extra lemon juice on my plate because I love the acidity! IngredientsDirectionsPound out chicken breasts until thin (about ¼ inch). Cut the pounded chicken breasts in half and season with salt and pepper. In a large skillet melt 1 tablespoon of the butter over medium-high heat. Reduce heat to medium. Cook chicken for 10 minutes or until no longer pink, turning once. Transfer chicken to a plate and cover with foil to keep warm. Add wine, broth, and shallot to hot skillet. Cook and stir, scraping up the browned bits from the bottom of the pan. Bring to boiling. Reduce the liquid by boiling gently for 15 minutes. Reduce heat to medium low. Stir in cream. Add the remaining 4 tablespoons butter, 1 tablespoon at a time, stirring after each addition until butter is melted. Stir in lemon juice (adjust the quantity to make it more or less acidic). Stir in thyme. Add additional salt and pepper to taste. To serve, spoon sauce over chicken and rice. ENJOY! |
Archives
March 2016
Categories |
My Thoughts
Check in here new and exciting posts! Everything from Recipes to Craft Ideas to Updates on our Family!
Photo used under Creative Commons from ViaggioRoutard